|
<< Click to Display Table of Contents >> Maintenance Schedule - Revolution LGR |
  
|
|
<< Click to Display Table of Contents >> Maintenance Schedule - Revolution LGR |
|
See SERVICE VIDEOS at Legendbrands.com/resources/service-technical-support/ for detailed instructions on maintaining this unit.
WARNING! Explosion or combustion hazard due to flammable refrigerant.
•Do not use or store near ignition sources, combustible gases, electric heaters or open flames.
•Do not drill into or braze the dehumidifier.
•Do not attempt to service the refrigeration system! Only authorized service center personnel should service or decommission the refrigeration system.
•Be aware that refrigerant gases can be odorless.
WARNING! ELECTRIC SHOCK HAZARD. Unplug unit before cleaning or servicing.
WARNING: Risk of dust and contaminants exposure. Use of respirator mask and gloves is recommended. If unit has been exposed to potentially dangerous contaminants, clean thoroughly and sanitize before reuse.
NOTICE: The unit is fitted with sensitive electronic sensors. Protect the sensors and their lead wires from damage and do not expose them to water or cleaning solution.
The following tools and supplies are needed to complete the maintenance procedures described in this manual:
Philips screwdriver
10 mm wrench
6 mm hex bit and T45 bit
¼ in. nut driver
Cleaning cloths
HEPA vacuum cleaner with soft brush nozzle and crevice nozzle.
Recommended
Cordless drill, small knife, small-jaw pliers, coil cleaning solution, rotomolded housing cleaning solution.
Inspect the electrical cord for damage. Look for fraying, cuts, etc. Do not use the unit if you find any damage. Contact your local authorized distributor for service.
Inspect filter. Replace if accumulation of dust and debris is visible.
NOTICE: Replace used filters only with a new Dri-Eaz 4‑PRO filter part no. #102312 (F583) (24-pack). Other filter types do not provide adequate filtration or airflow. Each filter is individually wrapped to protect filtration effectiveness. Remove the wrapper before installing the filter into the dehumidifier.
Inspect coils. Clean when dust accumulation is visible. In normal use, dust can accumulate and can restrict airflow, reducing performance and causing the unit to overheat. Use a vacuum cleaner with a brush tool and a soft cloth to remove any debris. Take care not to damage any interior components.
To maintain appearance, wipe interior and exterior surfaces with a damp cloth. For deep cleaning and a lasting, protective shine, use an automotive interior cleaner.
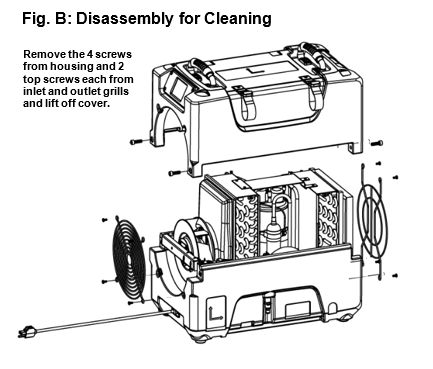
Clean pump check valve and basin. Remove grills and cover as shown in Fig. B. Remove screws from pump base and lift out pump. Wipe out pump basin with a damp cloth. Inspect the pump base for build-up of debris and clean if needed. Unthread barbed fitting with check valve and rinse fitting and check valve with clean water. Reinstall check valve into barbed fitting and install the barbed fitting into pump. Do not overtighten. Reinstall pump on base. Reinstall cover and grills.
Clean coils. With the cover removed, inspect both coils. If excessive dust and debris is present, vacuum thoroughly and/or clean with coil cleaner.